Better Than Takeout: How to Make Crispy Fried Sushi Rolls (That Won't Fall Apart)
Cristian
Recipe Developer | 200+ Tested Recipes | Founder of Meatless.io
Published: January 18, 2026 | Updated: January 18, 2026
There's a moment of pure joy when you bite into a perfectly fried sushi roll. That first crack of the golden crust giving way to cool, fresh fish and creamy avocado inside. The temperature contrast alone is addictive - warm and crunchy on the outside, refreshingly cool within.
But here's what nobody tells you: most home-fried sushi is a disaster. The roll falls apart in the oil. The seaweed turns chewy and tough. Everything absorbs grease like a sponge. I know because I ruined dozens of rolls before figuring out what actually works.
This guide covers the physics of frying that other recipes skip entirely. You'll learn the End-Cap technique for sealing rolls, the Flash-Freeze hack that firms everything up, and the exact temperature window that transforms homemade rolls into crispy perfection. Whether you're making a Deep Fried California Roll, Tempura Roll, or Hot Night Roll - these principles apply to all of them.
The Pre-Flight Check: Why Most Fried Sushi Fails
Before we cook anything, let's diagnose why your previous attempts probably went wrong. Understanding these failure points is the difference between restaurant-quality results and a greasy mess.
The Rice Temperature Paradox
Here's something confusing you'll find online: some fried rice recipes call for hot rice to help ingredients meld together. But sushi rolls are the opposite. You must use room temperature or cool rice.
The science: Hot rice releases steam. When that steam hits the nori (seaweed sheet), it instantly makes it soggy and weak. Then when the roll hits the hot oil, that weakened nori can't contain the pressure. The result? Your roll bursts open like a water balloon.
Cool rice keeps the nori's structural integrity intact. It stays firm enough to handle the thermal shock of the fryer without splitting.
The Moisture Danger Zone
I see this mistake constantly: people put spicy mayo or soy sauce inside the roll before frying. This is a recipe for disaster.
Liquid inside the roll turns to steam in the fryer. Steam expands. Pressure builds. And then - pop. Your roll explodes, splattering hot oil everywhere. Not fun.
The rule: Dry fillings inside (crab, avocado, cream cheese, cucumber). All wet sauces go on top after frying. No exceptions.
Structural Engineering: The End-Cap Technique
This is the technique that changed everything for me. The biggest failure point in fried sushi isn't the sides - it's the open ends of the cylinder where oil seeps in.
Most people just roll their sushi and throw it in the fryer. But those open ends are like two tunnels directly into the center of your roll. Hot oil rushes in, and the whole thing falls apart from the inside out.
The fix: You need to "plug" the ends. Press extra rice into both open ends to create a seal. Or dip just the ends in batter before coating the whole roll. This creates a protective barrier that keeps oil out.
Equipment & Ingredients You Actually Need
Let's talk about what actually matters and what you can skip.
- •Rice: Must be short-grain sushi rice (sticky). Do NOT use long-grain rice like jasmine or basmati - it will fall apart completely. Season cooked rice with rice vinegar, sugar, and salt.
- •Nori (Seaweed): Use full sheets, not half sheets. For fried rolls, you want that extra layer of protection against the oil. The double wrap makes a huge difference.
- •Beginner Fillings (Cooked): Imitation crab (surimi), cooked shrimp, roasted sweet potato, cream cheese, cucumber, avocado. Start here.
- •Advanced Fillings (Raw): Fresh salmon or tuna - but only if you're using the Flash-Freeze method to keep the center cool during frying.
- •Tools: Bamboo mat (helpful but optional), plastic wrap (essential for keeping rice off the mat), deep pot or fryer, and a kitchen thermometer (non-negotiable).
Choose Your Crunch: Tempura Batter vs. Panko Breading
There are two distinct paths to crispy fried sushi, and they produce completely different textures. Choose based on what you're filling the roll with.
Method A: The Panko Crust (Hearty & Crunchy)
Best for: California Rolls, Cream Cheese rolls, Philadelphia rolls - anything with rich, creamy fillings that can stand up to a substantial crust.
The setup: Standard 3-step dredging station. Flour in dish one (creates dry surface for egg to stick). Beaten egg in dish two (the glue). Panko breadcrumbs in dish three (the crunch).
The texture: Heavy, jagged crunch with irregular peaks and valleys. Resembles a chicken cutlet or croquette. Deeply satisfying and substantial.
Method B: The Tempura Batter (Light & Airy)
Best for: Vegetable rolls, delicate fish, anything where you want the filling to be the star rather than the coating.
The secret ingredient: Ice-cold club soda. Not water. Not beer. Club soda. The cold temperature and carbonation both inhibit gluten formation in the flour. This creates a lace-like, airy crust that shatters when you bite it.
The texture: Smooth, delicate, shattering crispness. Almost transparent in spots. Classic Japanese tempura style.
Pro tip: Don't overmix the tempura batter. Lumps are actually good - they create texture variation in the finished crust. Mix until just barely combined.
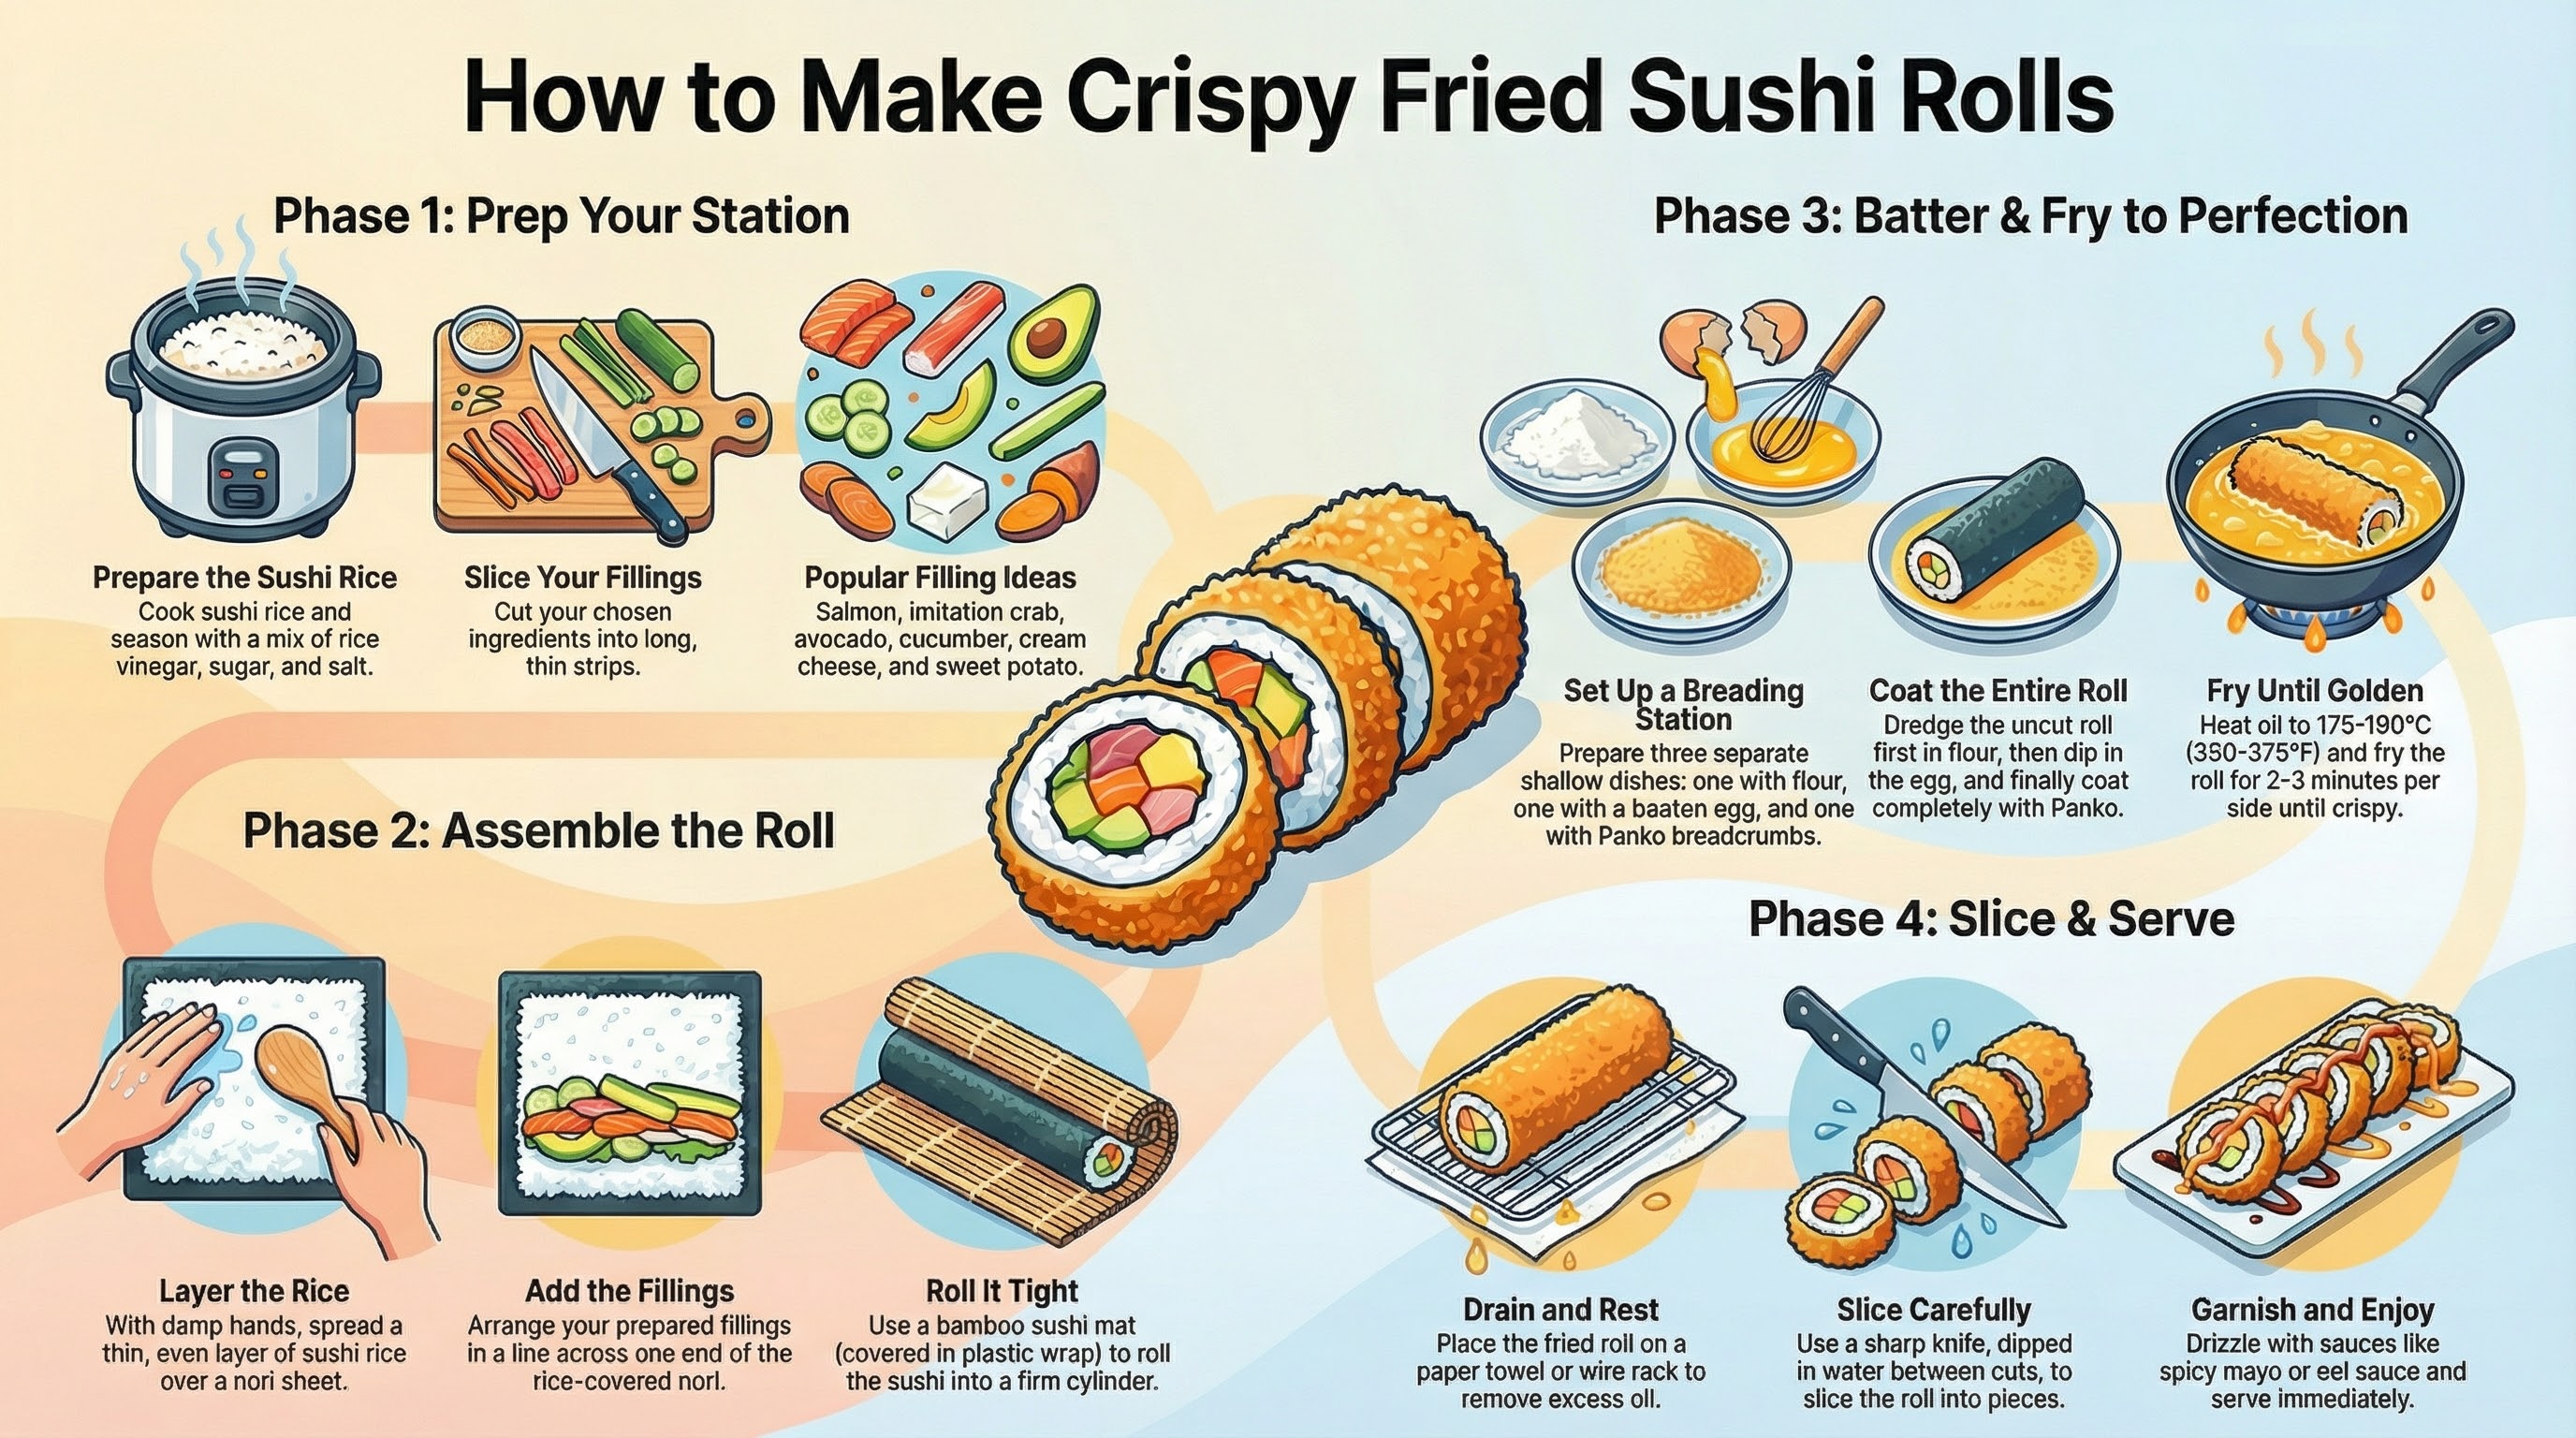
Step-by-Step: How to Fry Sushi Rolls
Alright, you understand the theory. Let's execute.
Step 1: The Sticky Rice Prep
Wash your sushi rice in cold water until the water runs clear - usually 4-5 rinses. This removes excess starch that would make it gummy. Cook according to package directions or use a rice cooker.
While the rice is still hot, gently fold in your seasoning mixture (rice vinegar, sugar, salt). Use a cutting motion rather than stirring to avoid mashing the grains.
Crucial: Let it cool to room temperature. Spread it in a wide container and fan it if you're impatient. Do not proceed with hot rice.
Step 2: The Roll
Wrap your bamboo mat in plastic wrap. Place nori rough-side up (the rough side grips rice better). Wet your hands to prevent sticking, then spread a thin, even layer of rice over the nori, leaving about 1 inch uncovered at the top edge.
Arrange your fillings in a horizontal line across the center. Don't overfill - this is the most common mistake. Less is more.
Roll using the tuck and pull method: Lift the edge nearest you, fold it over the fillings, then tuck it under and pull back toward you to tighten. Continue rolling away from you, applying gentle even pressure.
Step 3: The Flash-Freeze Hack
This is my secret weapon that I've never seen in other recipes. Place your finished rolls in the freezer for 10-15 minutes before battering.
The cold firms up everything - the rice, the fillings, the overall structure. When you go to dredge a room-temperature roll, it's soft and wants to fall apart. A chilled roll holds its shape perfectly through the coating process.
If you're using raw fish, this step is even more critical. It keeps the fish cold enough that the quick frying time won't cook it through.
Step 4: The Dredge
For Panko: Roll through flour, shaking off excess. Dip in beaten egg, ensuring full coverage. Press into panko, turning to coat all sides. Don't forget the sealed ends.
For Tempura: Dip the entire roll in batter. Lift and let excess drip off for 3-4 seconds. Go straight to the fryer.
Step 5: The Fry
Heat oil to 350-375F (175-190C). Use a thermometer - guessing doesn't work here. Too cool and the batter absorbs oil and gets greasy. Too hot and the outside burns before the batter cooks through.
Carefully lower rolls into the oil using tongs or a spider strainer. Don't drop them - that splashes. Fry for 2-3 minutes total, turning once halfway through, until evenly golden brown.
Key insight: You're only cooking the batter, not the filling. The filling is already cooked (or intentionally raw). When the batter looks done, the roll is done.
For raw fish (advanced): Fry for only 60-90 seconds. This creates the "Hot Outside, Cool Inside" effect where the crust is perfectly crispy but the fish center stays rare and cool.
The Finish: Sauces and Plating
Transfer fried rolls to a wire rack (not paper towels - they steam the bottom and make it soggy). Let rest for 60 seconds.
Slicing tip: Use a sharp knife dipped in water or rice vinegar between each cut. This prevents the rice from sticking and tearing.
The Essential Sauces
- •Spicy Mayo: Mix 1/2 cup mayonnaise with 2 tablespoons sriracha. Adjust heat to taste. Drizzle in zigzag pattern.
- •Eel Sauce (Nitsume): Simmer 3 tbsp soy sauce, 2 tbsp mirin, and 1 tbsp sugar until reduced to syrup consistency (about 5 minutes). Sweet, salty, and glossy.
- •Wasabi Cream: Mix 2 tablespoons mayonnaise with 1 teaspoon wasabi paste. Bright green heat that clears the sinuses.
Storing and Reheating: The Air Fryer Rescue
Let's be realistic - leftover fried sushi is never as good as fresh. But if you have extra, here's how to handle it.
Storage: Refrigerate for up to 3 days in an airtight container. Separate the pieces so they don't stick together.
Reheating: Whatever you do, do not microwave. It turns the crust into a chewy, soggy mess.
- •Air Fryer (Best Method): 350F for 3-4 minutes. The circulating hot air re-crisps the coating without drying out the rice inside.
- •Oven Method: 400F for 8-12 minutes on a wire rack. Works well but takes longer.
- •Toaster Oven: Similar to oven, 400F for 6-8 minutes for smaller batches.
Summary: The 5 Rules of Fried Sushi
- •Cool rice only - hot rice makes soggy nori that bursts
- •Seal the ends - the End-Cap technique prevents oil infiltration
- •Flash-freeze before battering - firms up structure for easier handling
- •350-375F oil temperature - use a thermometer, no guessing
- •2-3 minutes frying time - you're cooking the batter, not the filling
Crispy Fried Sushi Rolls
Restaurant-quality deep fried sushi rolls with a shatteringly crisp exterior and cool, fresh interior. Uses the End-Cap sealing technique and Flash-Freeze hack to prevent falling apart.
Prep Time
30 mins
Cook Time
15 mins
Total Time
45 mins
Servings
4 servings (16 pieces)
Ingredients
- •2 cups sushi rice (short-grain, not long-grain)
- •2.5 cups water
- •3 tbsp rice vinegar
- •1 tbsp sugar
- •1 tsp salt
- •4 sheets nori (full sheets, not half)
- •8 oz imitation crab (surimi) or cooked shrimp
- •1 ripe avocado, sliced
- •4 oz cream cheese, cut into strips
- •1 cucumber, julienned
- •Vegetable oil for frying (about 4 cups)
- •--- For Panko Method ---
- •1 cup all-purpose flour
- •2 large eggs, beaten
- •2 cups panko breadcrumbs
- •--- For Tempura Method ---
- •1 cup all-purpose flour
- •1 cup ice-cold club soda
- •1 egg yolk
- •--- For Sauces ---
- •1/2 cup mayonnaise
- •2 tbsp sriracha (for spicy mayo)
- •3 tbsp soy sauce, 2 tbsp mirin, 1 tbsp sugar (for eel sauce)
Instructions
- 1
Prep the Sushi Rice
Rinse rice until water runs clear. Cook with 2.5 cups water. While hot, gently fold in rice vinegar, sugar, and salt. Crucial: Let it cool to room temperature before rolling. Hot rice will steam the nori and cause it to burst in the fryer.
- 2
Roll the Sushi
Place nori rough-side up on plastic-wrapped bamboo mat. Spread a thin, even layer of rice leaving 1 inch at the top. Add fillings in a line across the center. Roll using the tuck-and-pull method, applying gentle pressure for a tight cylinder.
- 3
Seal the Ends (End-Cap Technique)
This is the most important step. Press extra rice into both open ends of the roll to 'plug' them. Alternatively, dip the ends in batter first to create a seal. This prevents oil from seeping inside and causing the roll to explode.
- 4
Flash-Freeze the Rolls
Place finished rolls in the freezer for 10-15 minutes. This firms up the shape dramatically, making them easier to dredge and handle without breaking. Don't skip this step.
- 5
Set Up Dredging Station
For Panko: Set up three shallow dishes with flour, beaten eggs, and panko. For Tempura: Whisk ice-cold club soda with flour and egg yolk until just combined (lumps are fine - they create texture).
- 6
Coat the Rolls
For Panko: Roll in flour, then egg, then press panko firmly onto all surfaces including the sealed ends. For Tempura: Dip entire roll in batter, letting excess drip off.
- 7
Fry to Golden Perfection
Heat oil to 350-375F (175-190C). Use a thermometer - this is non-negotiable. Carefully lower rolls into oil. Fry for 2-3 minutes total, turning once, until golden brown. You're only cooking the batter, not the filling.
- 8
Rest and Slice
Transfer to a wire rack for 1 minute. Using a sharp knife dipped in water or rice vinegar, slice into 4 pieces per roll. Drizzle with spicy mayo and eel sauce. Serve immediately.
Frequently Asked Questions
Why is my fried sushi roll falling apart in the oil?
Two main reasons: you didn't seal the ends, or your oil wasn't hot enough. Use the End-Cap technique to plug both ends with extra rice or batter before frying. And always verify your oil is at 350-375F with a thermometer. Oil that's too cool causes the batter to absorb grease and the roll to disintegrate.
Can I use an Air Fryer instead of deep frying?
Yes, but with caveats. Spray the coated rolls generously with oil and cook at 380F for 8-10 minutes, turning halfway. The result won't be as evenly golden as deep frying, and the texture is slightly different. It works best with panko-crusted rolls rather than tempura batter.
Can I make fried sushi rolls vegan?
Absolutely. Use avocado, cucumber, sweet potato, or marinated tofu for fillings. For the coating, use an egg-free tempura batter made with just ice-cold club soda and flour. The club soda provides the lift that eggs would normally give.
Should I use hot or cold rice for fried sushi?
Room temperature or cool rice only. This is the Rice Temperature Paradox - while some fried rice dishes call for hot rice, sushi rolls require cool rice. Hot rice steams the nori immediately, making it soggy and prone to bursting when it hits the hot oil. Cool rice keeps the nori's structural integrity intact.
Can I put spicy mayo inside the roll before frying?
Never put wet sauces inside before frying. Liquid turns to steam in the fryer, causing pressure buildup and explosions. Keep fillings dry (crab, avocado, cream cheese, cucumber). All sauces go on top after frying.
How do I keep the center rare when using raw fish?
Use the Flash-Fry window: fry for only 60-90 seconds at 375F. This creates the 'Hot Outside, Cool Inside' effect where the batter is crispy and golden but the raw fish center stays cool and fresh. The Flash-Freeze step is essential here to keep the fish cold going into the fryer.
How do I reheat leftover fried sushi?
Never microwave - it makes everything soggy. Air fryer is best: 350F for 3-4 minutes to re-crisp the coating without drying out the rice. Alternatively, use a regular oven at 400F for 8-12 minutes. The circulating heat re-crisps the panko coating effectively.
What's the difference between panko and tempura coating?
Panko gives a heavy, jagged crunch similar to a cutlet or croquette - best for California rolls and cream cheese rolls. Tempura batter creates a light, airy, shattering crispness - best for vegetable rolls or delicate fish. The secret to great tempura is ice-cold club soda, which inhibits gluten formation.
Topics covered in this guide: